Apache Airflow is an open-source platform that provides a way to programmatically author, schedule, and monitor workflows. It is widely used in the industry to manage complex data pipelines and automate ETL processes. At the core of Apache Airflow are Directed Acyclic Graphs (DAGs), which represent a collection of tasks that need to be executed in a specific order. In this article, we’ll explore the core components of Apache Airflow and show you how to set up and run Apache Airflow locally using Docker. By the end of this tutorial, you’ll have a better understanding of how to leverage Apache Airflow to manage your data workflows and automate your data pipelines. So let’s get started!
Table of Contents
What is Apache Airflow?
Apache Airflow started in Airbnb’s internal tools to manage complex workflows and became an open-source platform for developing, scheduling, and monitoring workflows.
Apache Airflow is one of the most popular workflow management platforms and it is written in Python.
What is DAG?
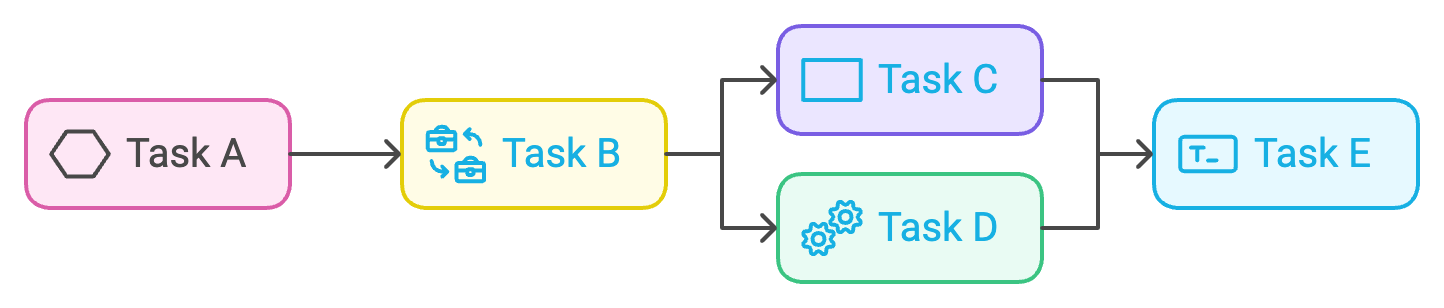
DAG ((Direct Acyclic Graph) is a sequence of tasks. As we see below A, B, C, D, and E is a sequence of tasks and is written in Python as we will discuss later. The most important thing that you must know is that dag mustn’t have any loop. For example, if Task A has been finished and goes to Task B Task B can’t go back again to Task A. So make sure that your DAG doesn’t contain any loop.
What is a Task?
The task is defined as a workflow unit and represented as a node in the DAG. In the above example, A is considered as a task as also B, C, D, and E.
There is a dependency between tasks. When Task A finishes, Task B and C will start, and when Task B and C finish, task D, and E will start.
Workflow is in one direction as it’s not allowed to start task A again after tasks D and E finish (NO Loop in DAG).
What is an Operator?
The operator determines what is going to be done. You can think that an Operator like an object or task in your dag and there are many kinds of operators we will explain:
- Action Operators: Operators that help you to execute something in your dag like BashOperator used to execute Bash commands, PythonOperator used to execute Python code, and PostgresOperator used to execute SQL queries.
- Transfer Operators: Operators used to transfer data from sources to destinations
- Sensor Operators: operators allow you to wait for something to happen before getting forward. For example, if you want to wait for a file to load into a specific location in this case you can use the FileSensor operator.
Core Components of Apache Airflow:
Knowing the architecture of Apache Airflow is crucial for effective workflow orchestration and data pipeline management. We’ll explore the key components and interactions that make up Apache Airflow’s architecture.
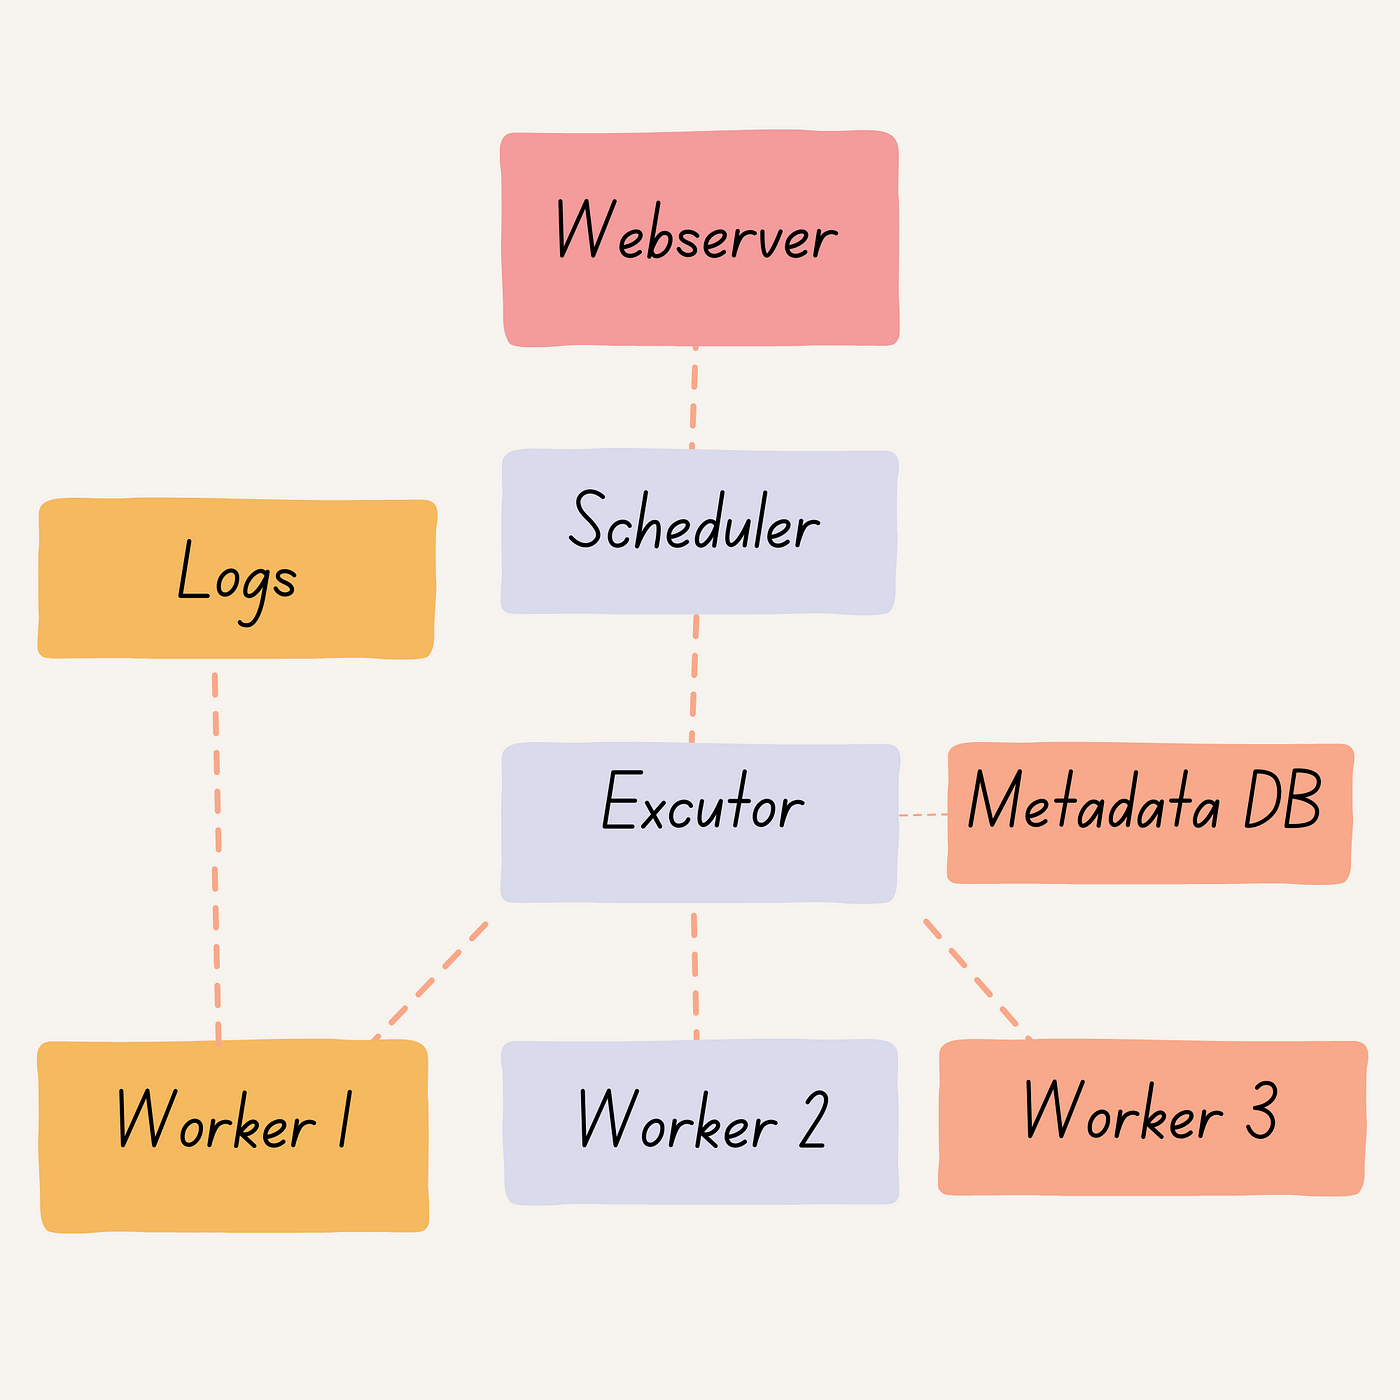
- Scheduler: The scheduler is responsible for triggering scheduled workflows and submitting tasks to the executor to run. It determines when a task should be executed based on the defined schedule and dependencies.
- Executor: Class defining how your tasks should be executed. The executor manages the running tasks by taking tasks from the scheduler and assigning them to workers to execute. It maintains the task state and ensures that tasks are executed in the correct order.
- Webserver: It’s a Flask server with Gunicorn serving UI. The web server provides a user interface to inspect and trigger debug DAG (Directed Acyclic Graph) and task behavior. It allows users to monitor the progress of workflows and individual tasks, view logs, and perform other administrative tasks.
- Workers: Workers are the place where the actual task is executed. They receive tasks from the executor and run them on a specific computing resource. Workers can be scaled up or down to handle different loads.
- Metadata DB: The metadata database stores information about DAGs (workflows) and task states. It is the central repository for all workflow-related information, including the history of task executions, dependencies, and schedules.
- Logs: Workers generate logs and provide a detailed record of the task execution. They capture information such as the start and end time of the task, any errors or exceptions that occurred, and any output produced by the task. Logs are essential for troubleshooting and monitoring the health of the system.
Types of Executors:
When it comes to running tasks in Apache Airflow, there are several types of executors available. Each executor has its own strengths and weaknesses, depending on the specific use case. In this section, we will explore four common types of executors: the Sequential Executor, the Local Executor, the Celery Executor, and the Kubernetes Executor. We will examine the features of each one, their advantages and disadvantages, and when to use them to optimize your workflow management.
Sequential Executor:
The sequential executor is the Default executor. runs one task instance at a time. and here Metadata DB can be SQLite.

Local Executor:
Run with scheduler, can run multiple tasks at the same time, and here Metadata DB can be MYSQL or PostgreSQL

Celery Executor:
Run tasks on a dedicated machine, distributed task query, and here Metadata DB can be MYSQL or PostgreSQL. The machine will work even if there are no running tasks. for this reason, celery is used if we have heavy traffic of tasks to avoid wasting resources.

Kubernetes Executor:
Use Kubernetes API to manage pods and you can assign resources based on your usage.

How to Run Apache Airflow via Docker
It is recommended that you install Docker Desktop.
It is possible to verify the installation of Docker by executing the following command in the command prompt:
docker -- version
To deploy Apache Airflow on Docker Compose, We should fetch docker-compose.yaml by executing the following command in the command prompt.
curl -LfO "https://airflow.apache.org/docs/apache-airflow/2.2.3/docker-compose.yaml"The resulting output should be as shown below

This file contains several service definitions:
– Postgres: This service runs a PostgreSQL database, which is commonly used as the backend database for Apache Airflow. Apache Airflow stores its metadata and task execution logs in this database, so it’s a crucial component for Apache Airflow to function properly.
– redis: This service runs a Redis server, which is commonly used as the message broker for Apache Airflow. The scheduler and worker use Redis to communicate with each other and coordinate task execution.
– airflow-webserver: This service runs the Apache Airflow web server, which is the main interface for interacting with Apache Airflow. The web server provides a user-friendly UI to manage Apache Airflow DAGs, schedules, and tasks.
– airflow-scheduler: This service runs the Apache Airflow scheduler, which is responsible for scheduling tasks and triggering task instances to run. The scheduler checks for new tasks to run and creates task instances based on the defined schedule.
– airflow-worker: This service runs the Apache Airflow worker, which executes tasks defined in Apache Airflow DAGs. The worker listens for new tasks to execute and runs them when triggered by the scheduler.
– airflow-triggerer: This service runs a separate process that listens for external triggers to kick off Apache Airflow DAGs. This can be useful for triggering workflows based on external events or data.
– airflow-init: This service runs initialization scripts to set up Airflow’s database schema and create an admin user. This is typically run only once when the Apache Airflow environment is first set up.
– flower: This service runs a separate process that provides a web-based UI for monitoring Apache Airflow tasks and workers. This can be useful for tracking the progress of tasks and troubleshooting issues.
All these services allow you to run Apache Airflow with CeleryExecutor.These services can all be important components of an Airflow deployment, depending on the specific needs and requirements of the project. The database and message broker services are particularly critical for Apache Airflow to function properly, while the triggerer and Flower services can provide additional functionality for managing and monitoring workflows.
Some directories in the container are mounted, which means that their contents are synchronized between your computer and the container.
– ./dags — you can put your DAG files here.
– ./logs — contains logs from task execution and scheduler.
– ./plugins — you can put your custom plugins here.
mkdir -p ./dags , ./logs , ./pluginsApache Airflow instance can now be initialized using the ‘airflow-init’ service
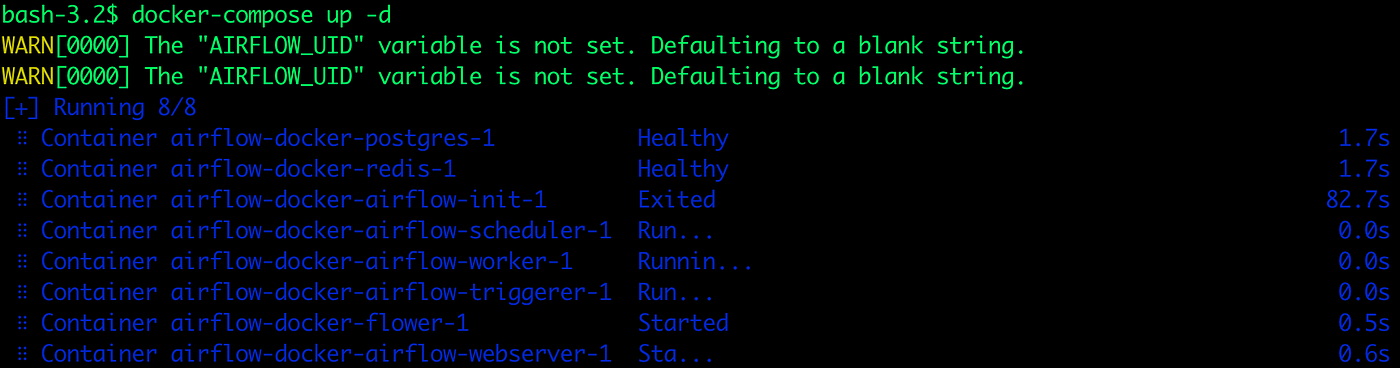
docker-compose up airflow-initThe resulting output should be as shown below. Exited with code 0 means it’s deployed successfully. You may get a warning that AIRFLOW_UID is not set, but you can ignore it.

Now that all the related services have been initialized, it’s time to run Airflow.
docker-compose up -dThe resulting output should be as shown below
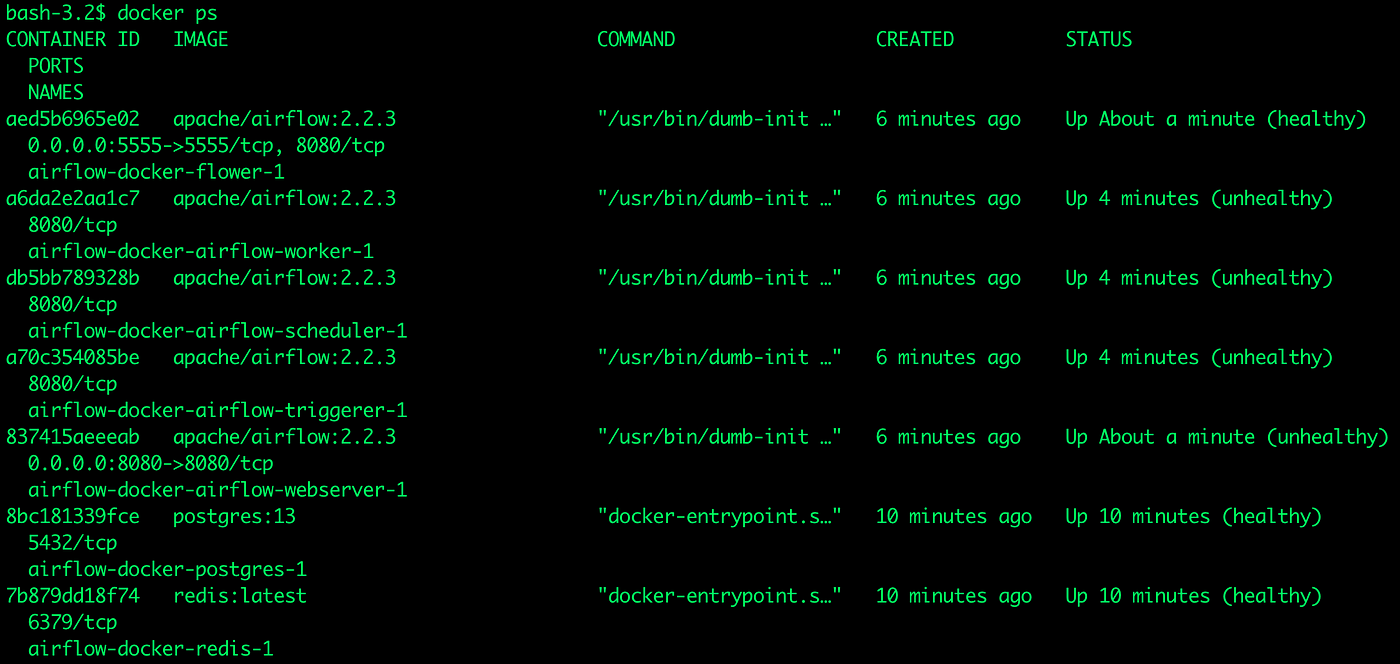
To check if the airflow service is running, Execute the following command in the command prompt
docker psThe resulting output should be as shown below:
Open a web browser and enter the following localhost URL: http://localhost:8080. Set the username “airflow” and the password “airflow”
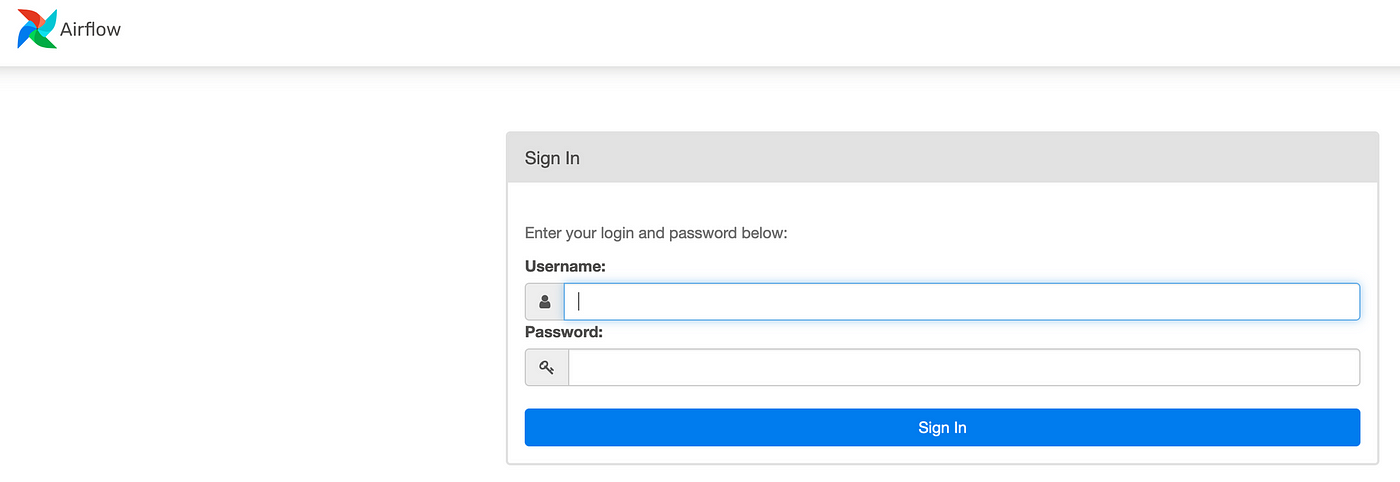
Finally, Apache Airflow is up as shown below
Great and good job now it’s time to build your first DAG
Understanding the DAG Code
In this section, we will focus on the code required to create a DAG in Apache Airflow. We will cover the basics of importing libraries and defining the DAG, as well as how to set up dependencies, schedule tasks, and define operators. Understanding this code is essential to building effective DAGs in Apache Airflow, and we will provide practical examples and best practices to help you get started. Whether you’re a seasoned Apache Airflow user or just starting out, this section will provide you with a solid foundation for creating DAGs in Apache Airflow.
1. Import Libraries
Import the necessary modules and packages, including the `DAG` class from Apache Airflow, the `BashOperator` class, and the days_ago and timedelta functions from Apache Airflow’s dates module.
from airflow import DAG
from dpatetime import timedelta
from airflow.utils.dates import days_ago
from airflow.operators.bash_operator import BashOperator
2. Set Up Default Arguments
Default arguments are a key component of defining DAGs in Airflow. These arguments provide a way to specify common settings and behaviors for all tasks in a DAG, such as the start date, email notifications, retries, and other properties. By setting default arguments, you can avoid having to repeat the same settings for each individual task and ensure that all tasks in a DAG are configured consistently.
default_args = {
'owner': 'airflow',
'depends_on_past': False,
'start_date': datetime(2018, 9, 1),
'email_on_failure': False,
'email_on_retry': False,
'schedule_interval': '@daily',
'retries': 1,
'retry_delay': timedelta(seconds=5),
}
In the above snippet:
- owner: Specifies the owner of the DAG. This is typically the name of the person or team responsible for maintaining the DAG.
- depends_on_past: Specifies whether a task instance should depend on the success of the previous task instance.
- start_date: Specifies the date and time when the DAG should start running.
- email_on_failure: Specifies whether to send an email notification when a task fails.
- email_on_retry: Specifies whether to send an email notification when a task is retried.
- schedule_interval: The frequency with which the task should run. In this case, it is set to run once per day.
- retries: Specifies the number of times to retry a failed task.
- retry_delay: Specifies the delay between retries. In this case, we’re using a delay of 5 seconds.
3. Define the DAG
In this step, we will define the dag. It will include:
- `dag_id`: A unique identifier for the DAG. In this case, it is set to `ETL_DAG`.
- `default_args`: A dictionary containing default values for various configuration options related to the DAG. These options were previously defined in the default_args dictionary that we discussed in the previous section.
- `description`: An optional string that describes the purpose of the DAG. In this case, it is set to `ETL DAG using Bash`.
- `schedule_interval`: The frequency with which the DAG should run. In this case, it is set to run once per day, as indicated by the timedelta(days=1) argument.
dag = DAG(
dag_id='ETL_DAG',
default_args=default_args,
description='ETL DAG using Bash',
schedule_interval=timedelta(days=1),
)
4. Define the Tasks
In this step, we will define the tasks that make up the ETL workflow. Each task will include:
- A task_id string that uniquely identifies the task.
- The Bash command that the task should execute.
- The DAG that the task belongs to, as defined in the previous steps.
#Download the file from the URL located
download=BashOperator(
task_id='download',
bash_command='curl "https://cf-courses-data.s3.us.cloud-object-storage.appdomain.cloud/IBM-DB0250EN-SkillsNetwork/labs/Apache%20Airflow/Build%20a%20DAG%20using%20Airflow/web-server-access-log.txt" > /opt/airflow/dags/web_server_log.txt',
dag=dag,
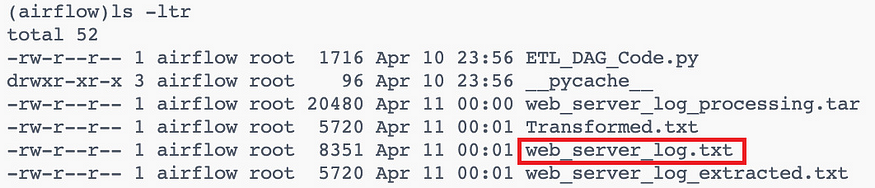
)As you can see below, the `web_server_log.txt` file has been downloaded
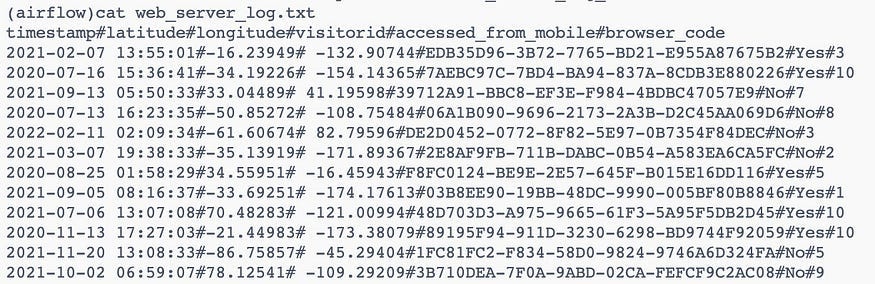
And the `web_server_log.txt` file contains many columns like timestamp, latitude, longitude,visitorid, and so on as shown below
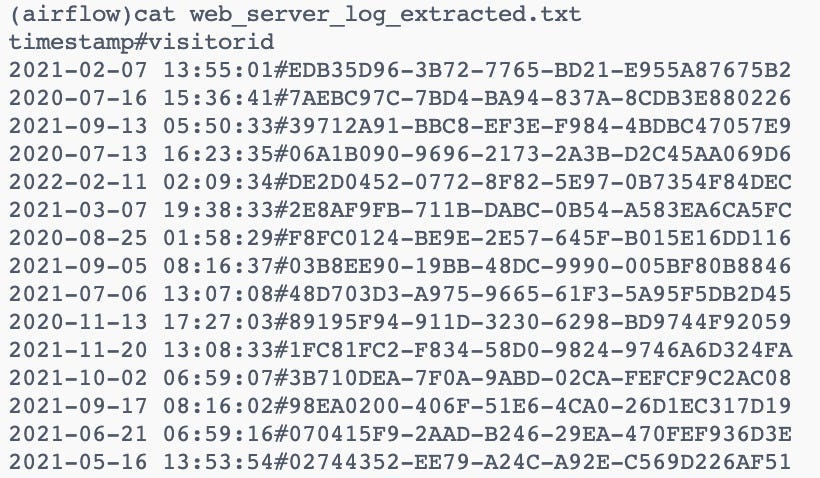
We will extract two columns (timestamp,visitorId) from the file downloaded. So we will use the bash command to extract the two columns and create a new file with the name `web_server_log_extracted.txt`
#Extract two columns from the file downloaded
extract=BashOperator(
task_id='extract',
bash_command='cut -f1,4 -d"#" /opt/airflow/dags/web_server_log.txt > /opt/airflow/dags/web_server_log_extracted.txt',
dag=dag,
)
As you can see below, the `web_server_log_extracted.txt` file has been created with the extracted columns.
Now we will transform the extracted columns to be all lowercase and create a new file with the transformed data.
#Transform the extracted columns to be all lowercase
transform=BashOperator(
task_id='transform',
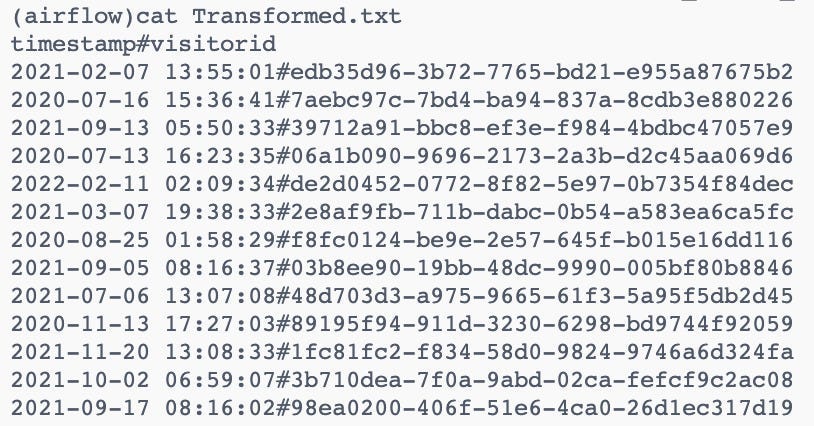
bash_command='tr "[A-Z]" "[a-z]" < /opt/airflow/dags/web_server_log_extracted.txt > /opt/airflow/dags/Transformed.txt',
dag=dag,
)As you can see below, the `Transformed.txt` file has been created with the transformed columns.
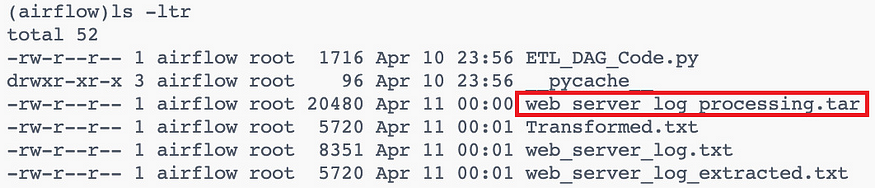
The last step is to compress the transformed and extracted data
#Compress the transformed and extracted data
load=BashOperator(
task_id='load',
bash_command='tar cfv /opt/airflow/dags/web_server_log_processing.tar /opt/airflow/dags/web_server_log_extracted.txt /opt/airflow/dags/Transformed.txt',
dag=dag,
)
As you can see below, the `web_server_log_processing.tar` file has been created.
5. Define the Task Dependencies
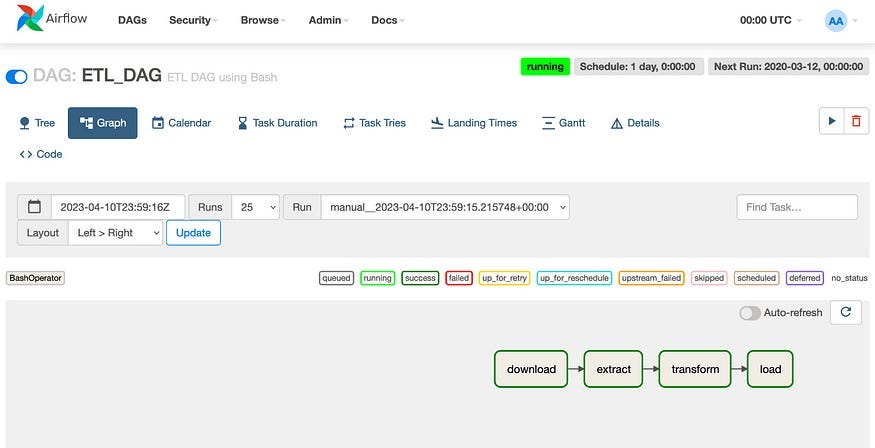
This code defines the task dependencies in an Airflow DAG. Tasks in Airflow can depend on other tasks, and this is defined using the >> operator. In this example, The output of `download` is used as the input for `extract`, and the output of `extract` is used as the input for `transform` and so on. In other words, the download, extract, and transform tasks are dependencies or upstream tasks for the load, which is a downstream task.
download >> extract >> transform >> loadAnd when the workflow is successful, the output will be like this:
In the previous example, we used sequential execution but sometimes we need another type of execution like
- Parallel execution: In some workflows, you may have multiple tasks that can be executed in parallel, rather than in a strict sequential order. For example, you may have a task that downloads data from multiple sources in parallel, followed by a task that merges the data. In this case, the order of execution may not be strict, and the upstream and downstream tasks would need to be identified based on their dependencies. Here is an example:
with DAG('parallel_execution', start_date=datetime(2023, 3, 29), schedule_interval=None) as dag:
download_task_1 = PythonOperator(
task_id='download_task_1',
python_callable=download_data_from_source,
op_kwargs={'source': 'source_1'}
)
download_task_2 = PythonOperator(
task_id='download_task_2',
python_callable=download_data_from_source,
op_kwargs={'source': 'source_2'}
)
download_task_3 = PythonOperator(
task_id='download_task_3',
python_callable=download_data_from_source,
op_kwargs={'source': 'source_3'}
)
merge_task = PythonOperator(
task_id='merge_task',
python_callable=merge_data,
provide_context=True
)
[download_task_1, download_task_2, download_task_3] >> merge_taskpy
The three download tasks can be executed in parallel since they don’t have any dependencies on each other. The merge_task is downstream of all three download tasks, and can only be executed after they have all been completed successfully.
In this article, we have provided you with an understanding of the code required to build these workflows. By following these guidelines, you can streamline your data processing pipelines, automate your workflows, and improve the efficiency of your data operations. Whether you are a data engineer, data scientist, or just getting started with Apache Airflow, we hope this article has provided you with a solid foundation for building and managing your own workflows using Apache Airflow DAGs.
I hope you enjoyed reading this and finding it informative, feel free to follow, add your comments, thoughts, or feedback, and don’t forget to get in touch on LinkedIn or follow my medium account to keep updated.
Learn How To Schedule And Automate Spark Jobs Using Apache Airflow.